Intent
Facade Pattern is to provide a unified interface to a set of interfaces in a subsystem. Facade defines a higher-level interface that makes the subsystem easier to use
Design Patterns: Elements of Reusable Object-Oriented Software
A facade pattern can help:
- Improve readability and usability.
- Since Facade Pattern creates a high-level interface for clients 1 to use, this way complex logic has been hidden behind the interface, which gives clients a better code readability
- Decouple client implementation from the complex subsystem.
- The Law of Demeter (aka Principle of Least Knowledge) mainly was saying that the object should only talk to the most immediate object and fewer objects as possible. This helps greatly to decouple your service.
Example
The example here is quoted from Facade Design Pattern in Java - Baeldung
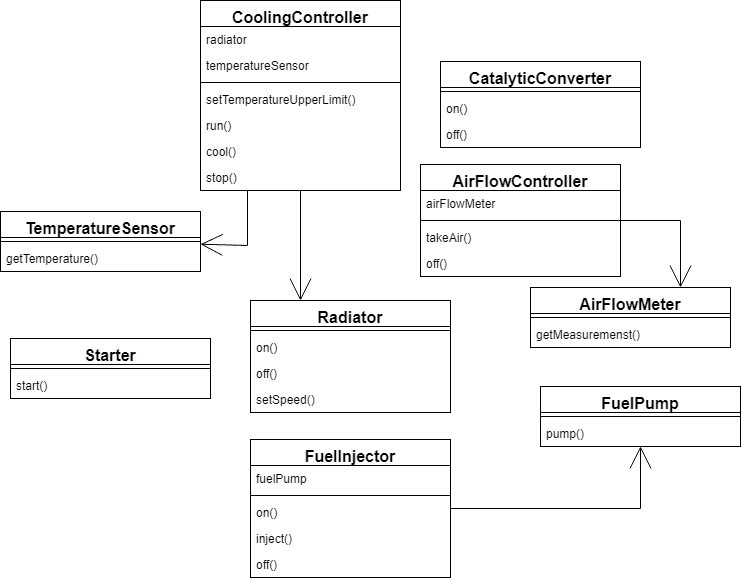
Given the above diagram, we need the following steps to start or shut down a car
Start the engine
airFlowController.takeAir()
fuelInjector.on()
fuelInjector.inject()
starter.start()
coolingController.setTemperatureUpperLimit(DEFAULT_COOLING_TEMP)
coolingController.run()
catalyticConverter.on()
Stop the engine
fuelInjector.off()
catalyticConverter.off()
coolingController.cool(MAX_ALLOWED_TEMP)
coolingController.stop()
airFlowController.off()
However, if we use a Facade pattern, to “wrap” the subsystem, hiding the complex details from the client:
public class CarEngineFacade {
    private static int DEFAULT_COOLING_TEMP = 90;
    private static int MAX_ALLOWED_TEMP = 50;
    private FuelInjector fuelInjector = new FuelInjector();
    private AirFlowController airFlowController = new AirFlowController();
    private Starter starter = new Starter();
    private CoolingController coolingController = new CoolingController();
    private CatalyticConverter catalyticConverter = new CatalyticConverter();

    public void startEngine() {
        fuelInjector.on();
        airFlowController.takeAir();
        fuelInjector.on();
        fuelInjector.inject();
        starter.start();
        coolingController.setTemperatureUpperLimit(DEFAULT_COOLING_TEMP);
        coolingController.run();
        catalyticConverter.on();
    }

    public void stopEngine() {
        fuelInjector.off();
        catalyticConverter.off();
        coolingController.cool(MAX_ALLOWED_TEMP);
        coolingController.stop();
        airFlowController.off();
    }
the engine starts and stops look like this:
facade = new CarEngineFacade();

facade.startEngine();

facade.stopEngine();
Real-world Example
SLF4J and Log family
SLF4J (Simple Logging Facade for Java) is the best example for Facade Pattern. Here, SLF4J defines the API interface, various Log frameworks like Log4j or Logback, utilizes the interface defined in SLF4J to interact with your application.
To know more, check out my post on Logging frameworks
AWS API Gateway Authorizer
The implementation of AWS API Gateway Authorizer is also a industry-level example of Facade Pattern. It defines the interface, but give the flexibility/freedom for user to select which Authorizer provider they want to use better, like using IAM or a custom Lambda for it.
To know more, check out my post on AWS API Gateway
AWS S3 Multi-part upload
Suppose we would like to use Java to do the S3 uploading job, then you might consider multi-part uploading, in which you can upload a file in many segments of the file and then integrate or merge these segments together on S3.
To do this, AWS S3 Java SDK provides two sets of API for developers to use
- High-level API:
TransferManager - Low-level API:
AmazonS3Client.initiateMultipartUpload()
TransferManager
try {

    // This is builder pattern which we will cover this soon ^_^
    AmazonS3 s3Client = AmazonS3ClientBuilder.standard()
            .withRegion(clientRegion)
            .withCredentials(new ProfileCredentialsProvider())
            .build();

    TransferManager tm = TransferManagerBuilder.standard()
            .withS3Client(s3Client)
            .build();

    // TransferManager processes all transfers asynchronously,
    // so this call returns immediately.
    Upload upload = tm.upload(bucketName, keyName, new File(filePath));

    // Optionally, wait for the upload to finish before continuing.
    upload.waitForCompletion();

} catch (AmazonServiceException e) {
    // The call was transmitted successfully, but Amazon S3 couldn't process
    // it, so it returned an error response.
    log.error("File uploaded successfully, Amazon S3 could not process your request. Error details = {}", ExceptionUtils.getMessage(e));
    throw new InternalServerException();
} catch (SdkClientException e) {
    // Amazon S3 couldn't be contacted for a response, or the client
    // couldn't parse the response from Amazon S3.
    log.error("Amazon S3 is not responding your request. Error details = {}", ExceptionUtils.getMessage(e));
    throw new InternalServerException();
}
AmazonS3Client.initiateMultipartUpload()
try {
    AmazonS3 s3Client = AmazonS3ClientBuilder.standard()
            .withRegion(clientRegion)
            .withCredentials(new ProfileCredentialsProvider())
            .build();

    // Create a list of ETag objects. You retrieve ETags for each object part uploaded,
    // then, after each individual part has been uploaded, pass the list of ETags to
    // the request to complete the upload.
    List<PartETag> partETags = new ArrayList<PartETag>();

    // Initiate the multipart upload.
    InitiateMultipartUploadRequest initRequest = new InitiateMultipartUploadRequest(bucketName, keyName);
    InitiateMultipartUploadResult initResponse = s3Client.initiateMultipartUpload(initRequest);

    // Upload the file parts.
    long filePosition = 0;
    for (int i = 1; filePosition < contentLength; i++) {
        // Because the last part could be less than 5 MB, adjust the part size as needed.
        partSize = Math.min(partSize, (contentLength - filePosition));

        // Create the request to upload a part.
        UploadPartRequest uploadRequest = new UploadPartRequest()
                .withBucketName(bucketName)
                .withKey(keyName)
                .withUploadId(initResponse.getUploadId())
                .withPartNumber(i)
                .withFileOffset(filePosition)
                .withFile(file)
                .withPartSize(partSize);

        // Upload the part and add the response's ETag to our list.
        UploadPartResult uploadResult = s3Client.uploadPart(uploadRequest);
        partETags.add(uploadResult.getPartETag());

        filePosition += partSize;
    }

    // Complete the multipart upload.
    CompleteMultipartUploadRequest compRequest = new CompleteMultipartUploadRequest(bucketName, keyName,
            initResponse.getUploadId(), partETags);
    s3Client.completeMultipartUpload(compRequest);

} catch (AmazonServiceException e) {
    // The call was transmitted successfully, but Amazon S3 couldn't process
    // it, so it returned an error response.
    log.error("File uploaded successfully, Amazon S3 could not process your request. Error details = {}", ExceptionUtils.getMessage(e));
    throw new InternalServerException();
} catch (SdkClientException e) {
    // Amazon S3 couldn't be contacted for a response, or the client
    // couldn't parse the response from Amazon S3.
    log.error("Amazon S3 is not responding your request. Error details = {}", ExceptionUtils.getMessage(e));
    throw new InternalServerException();
}
You can check how easy to use TransferManager instead of directly using the initiateMultipartUpload() method
Keras and Tensorflow
If you are interested in Machine Learning, you might use Keras or Tensorflow before. Just like what Keras said on their website
Keras is a deep learning API written in Python, running on top of the machine learning platform TensorFlow.
You can check the example that the difference of the codes in Keras and Tensorflow
Keras
from tensorflow.keras.models import Sequential
from tensorflow.keras.layers import Dense

model = Sequential()
model.add(Dense(units=64, activation='relu'))
model.add(Dense(units=10, activation='softmax'))

model.compile(loss='categorical_crossentropy',
              optimizer='sgd',
              metrics=['accuracy'])

# x_train and y_train are Numpy arrays
model.fit(x_train, y_train, epochs=5, batch_size=32)

loss_and_metrics = model.evaluate(x_test, y_test, batch_size=128)

classes = model.predict(x_test, batch_size=128)
Tensorflow
import tensorflow as tf

# Prepare an optimizer.
optimizer = tf.keras.optimizers.Adam()
# Prepare a loss function.
loss_fn = tf.keras.losses.kl_divergence

# Iterate over the batches of a dataset.
for inputs, targets in dataset:
    # Open a GradientTape.
    with tf.GradientTape() as tape:
        # Forward pass.
        predictions = model(inputs)
        # Compute the loss value for this batch.
        loss_value = loss_fn(targets, predictions)

    # Get gradients of loss wrt the weights.
    gradients = tape.gradient(loss_value, model.trainable_weights)
    # Update the weights of the model.
    optimizer.apply_gradients(zip(gradients, model.trainable_weights))
You can find out that the typical for loop for training data is ignored and was included in Keras model.fit() method. If you are new to Machine Learning, I think you will benefit from this. But later, when you are familiar with Keras, Tensorflow, personally, I would recommend using Tensorflow or Pytorch for your Deep Learning / Machine Learning model implementation.
References
- Refacoting Guru - Facade Pattern
- Baeldung - Facade Pattern
- Design Patterns: Elements of Reusable Object-Oriented Software
- Head First Design Patterns
- Uploading an object using multipart upload
- Keras
-
client here has several different meanings
- it could be clients or customers who use your package or library.
- it could be a downstream or upstream service that depends on your codes.
- it could be other classes or components in the same service that depends on your codes.